

Dust accumulates fastest in the spots that are hardest to clean. Studies suggest the average home collects up to 40 pounds of dust per year, and a significant share of it settles in corners, crevices, and behind appliances that rarely get touched. Knowing how to remove dust from hard-to-reach places is not just a cleanliness issue; it directly affects indoor air quality, allergy symptoms, and even appliance efficiency. This guide breaks down the best tools, techniques, and routines to tackle every awkward spot in your home.
Why Hard-to-Reach Dust Is a Bigger Problem Than It Looks
Dust in visible areas gets cleaned regularly. The trouble spots, ceiling fan blades, refrigerator coils, baseboard corners, window tracks, and the space under a sofa, can go months without attention. Over time, that buildup becomes a reservoir for allergens, mold spores, pet dander, and dust mites.
Beyond health concerns, dust on refrigerator coils forces the compressor to work harder, raising energy costs. Dust packed into vents reduces airflow. Electronics clogged with fine particles can overheat. Cleaning these spots is maintenance, not just tidiness.
The Right Tools for Removing Dust From Hard-to-Reach Places
Choosing the correct tool makes the difference between moving dust around and actually removing it.
Telescoping Dusters With Pivoting Heads
Good Housekeeping cleaning experts call telescoping dusters with pivoting heads the primary tool for high moldings, light fixtures, and awkward angles. The extendable handle eliminates the need for ladders in most rooms, and the pivoting head locks at different angles to reach around obstacles, ceiling fan blades, crown molding, and the tops of tall cabinets all become manageable.
Look for heads made from microfiber or fluffy chenille fibers, which grab and hold particles rather than flicking them into the air.
Microfiber Dusters and Cloths
Microfiber remains the go-to material for intricate surfaces like blinds, electronics, and decorative trim. For window blinds, close the slats fully and dust each slat from top to bottom, then flip the slats the other direction and repeat. This method cleans both sides without scattering dust across the room.
Pro tip: A slightly damp microfiber cloth picks up fine dust more effectively than a dry one on smooth surfaces like appliance tops and shelving.
Compact Vacuums With Crevice and Brush Attachments
Handheld and cordless vacuums equipped with crevice tools and brush attachments are now considered a core solution for tight spaces. Crevice tools reach into couch seams, corner cupboards, window tracks, and the narrow gap between appliances and cabinets. Brush attachments add gentle agitation without scratching surfaces.
For the most demanding jobs, refrigerator coils, dryer vents, and baseboard heater fins, a full-size vacuum with a long crevice tool beats any manual duster.
Slim Gap Dusters and Flat Mops
A new category of retractable gap dusters features extra-slim, extendable microfiber heads sized to slide under sofas, beds, and cabinet kick-plates. Some measure as narrow as 1.5 cm in height, reaching places where even a robot vacuum cannot fit. Long, flat dust mops serve a similar purpose for under-bed and under-appliance cleaning.
Air Blowers and Canned Air
Compressed air dusters work best for quick dust removal from electronics, keyboards, and tight mechanical spaces. However, blowers redistribute dust rather than capturing it, always follow up with a vacuum or microfiber cloth to collect what gets displaced.
| Tool | Best For | Limitation |
|---|---|---|
| Telescoping duster | Ceilings, fans, high shelves | Less effective in tight grooves |
| Microfiber cloth | Blinds, appliances, trim | Requires direct contact |
| Crevice vacuum tool | Gaps, coils, vents, tracks | Cord or battery limits range |
| Slim gap duster | Under furniture, kick-plates | Manual effort required |
| Canned air / blower | Electronics, keyboards | Spreads dust if not followed by vacuuming |
Step-by-Step Techniques to Remove Dust From Hard-to-Reach Places
Start at the Top and Work Down
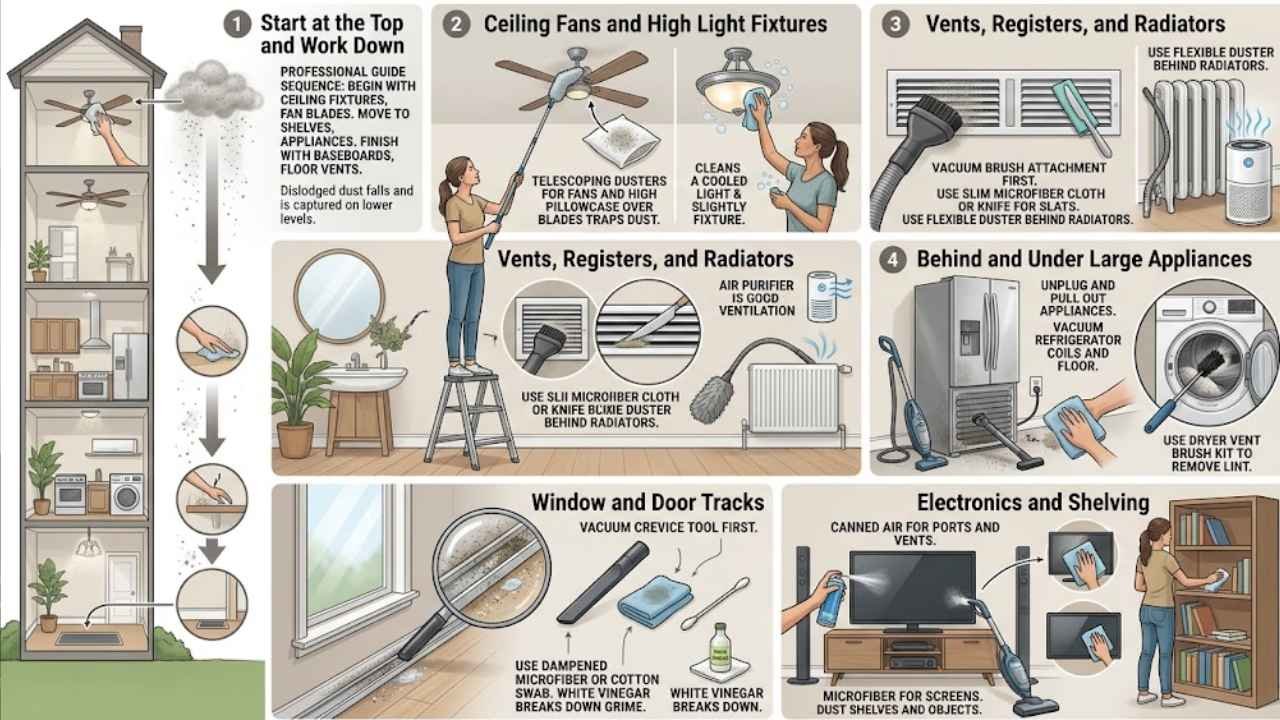
Professional cleaning guides consistently recommend a top-down approach. Begin with ceiling fixtures, fan blades, and the tops of cabinets. Move to mid-level surfaces like shelves and appliance tops. Finish with baseboards, floor vents, and under-furniture areas. This sequence ensures that any dust dislodged from higher surfaces gets captured when you clean lower areas, not the other way around.
Ceiling Fans and High Light Fixtures
Use a telescoping duster with the head angled to wrap around each fan blade. A pillowcase slid over each blade and pulled back also works well, it traps the dust inside rather than dropping it on the floor. For light fixtures, wait until bulbs are cool, then use a microfiber duster or a slightly damp cloth on the housing.
Vents, Registers, and Radiators
For air vents and registers, use a vacuum brush attachment first to pull out loose dust. Follow with a slim microfiber cloth or a butter knife wrapped in microfiber to clean between the slats. Behind radiators, a long flexible duster or a vacuum with an extended crevice tool reaches the fins and the wall behind them.
Ensure good ventilation when disturbing heavy dust buildup in vents, open a window or run an air purifier nearby.
Behind and Under Large Appliances
Refrigerator coils, usually located at the bottom front or along the back, are among the dustiest spots in any home. Unplug the refrigerator, pull it away from the wall, and use a vacuum brush attachment along the coils and the floor underneath. A slightly damp microfiber cloth handles any sticky residue that remains.
Apply the same process to washing machines, dryers, and dishwashers. Dryer vent ducts deserve special attention; a dedicated dryer vent cleaning brush kit reaches deep into the duct to remove lint and dust that poses a fire risk.
Window and Door Tracks
Window tracks collect a mix of dust, grit, and moisture. Use a vacuum crevice tool first, then a dampened microfiber cloth or a cotton swab for the corners. A small amount of white vinegar on the cloth helps break down built-up grime without harsh chemicals.
Electronics and Shelving
For computers, gaming consoles, and entertainment centers, use short bursts of canned air to dislodge dust from ports and vents, then immediately vacuum the surrounding area. Microfiber cloths handle screen surfaces and flat areas. For bookshelves and display shelves, remove items in sections and dust both the objects and the shelf surface before replacing them.
Smart and Robotic Tools Changing the Game in 2026
The latest generation of robotic vacuums is specifically engineered to reach spots that previously required manual effort. Dyson’s R2 Nurovi uses triangular mopping pads based on Reuleaux geometry to push deep into corners, a geometry that standard round robots cannot match. MOVA’s newest robot vacuum features side brushes that automatically extend when the unit detects a narrow gap. Dreame’s Omni-Brush includes built-in lighting to reveal fine dust in dark or hard-to-reach spots before and after cleaning.
For cordless stick vacuums, detail-cleaning kit attachments, including illuminated cleaner heads, make previously invisible dust visible along floor edges and in crevices, improving thoroughness without extra effort.
These tools do not replace manual techniques for high surfaces or appliance coils, but they significantly reduce how often those manual sessions are needed.
Maintaining a Dust-Free Home Between Deep Cleans
“The best cleaning strategy is one that prevents heavy buildup in the first place.”
- Run HVAC filters rated MERV 11 or higher and replace them on schedule to reduce airborne particles
- Use doormats at every entry point to limit the dust and debris tracked inside
- Wash bedding weekly, beds are one of the largest dust mite habitats in any home
- Wipe ceiling fan blades monthly rather than waiting for visible buildup
- Keep a slim gap duster near the sofa for quick weekly passes under furniture
Final Thoughts
Learning how to remove dust from hard-to-reach places is a skill that pays off in cleaner air, lower energy bills, and a healthier living environment. The most effective approach combines the right tools, telescoping dusters, microfiber cloths, crevice vacuum attachments, and slim gap tools, with a consistent top-down cleaning sequence.
Start this week by tackling one neglected area: the refrigerator coils, the ceiling fan blades, or the window tracks. Once those spots are clean, add them to a monthly rotation. Over time, these small habits eliminate the heavy buildup that makes hard-to-reach dust feel like an impossible problem.